Foreign Insulators
by Marilyn Albers
Reprinted from "INSULATORS - Crown Jewels of the Wire", December 1984, page 20
INSULATOR SHADOW PROFILES
At the present time we are about to begin work on a supplement for each of
our foreign insulator books: GLASS INSULATORS FROM OUTSIDE NORTH AMERICA by
Marilyn Albers, and WORLDWIDE PORCELAIN INSULATORS by Marilyn Albers and Jack H.
Tod.
We have so much new material since these books were published, and in order
for the books to continue to be effective tools for the collector of foreign
insulators, we feel that supplements are badly needed.
There is a way you can
help. We would like a shadow drawing and a few basic measurements of any
insulator you have in your collection that was not included in either of these
first two books. The method outlined below is much more simple than any we have
suggested to you before, and has been worked out for us by Jack H. Tod.
The
making of accurate shadow profiles requires a crisp shadow that can be traced
easily, and a light source far enough away from the insulator to nearly
eliminate the size and parallax distortion. The following method is very easy to
set up and gives excellent results.
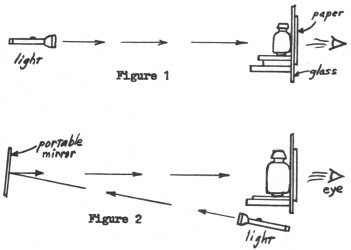
As shown in Figure 1, block up the insulator
perfectly vertical and closely against a window pane of the house.
Place a light source up to 50' away from the window in the yard (the farther the
less inaccuracies). Place ordinary paper on inside of the window, and trace the
shadow from that side.
This should be done at night. An ordinary spot flashlight,
even at 50', gives a crisp shadow. A 100 watt light bulb at 50' gives a usable
shadow if the inside room lighting is subdued. A 150 watt yard flood light makes
a crisp shadow at 50' or more.
In making the setup, position the light source
perpendicular from the window where the insulator sits. Use a drawing triangle
or a rectangular piece of wood or cardboard on the inside of the window to sight
out to the light position and get it into the proper vertical and horizontal
placement. With the light 50' or more distant, a positioning error of 1' is
acceptable.
Before drawing the profile, rotate the insulator until its top groove is lined up with the light beam, as you can notice by its shadow while
you're turning it.
Trace the profile with a sharpened pencil, being particularly
careful to follow the shadow at the grooves, rounded corners and other important
points.
If you have a loose pane of glass, you can make the setup entirely inside the
house by sturdily propping up the glass pane vertically on a table. Once again,
use a rectangular block or cardboard to sight from the glass to the light source
to position the light source perpendicularly from the tracing spot on the glass.
If you cannot get the light back 15' to 20 , you can lengthen the light path by
using a portable wall mirror, as shown in Figure 2. The light itself can be
positioned anywhere else -- down a side hallway, by your side, or wherever. In
this case, sight from the glass to position the mirror perpendicular from the
glass surface; then position the flashlight to make it shine on the mirror; then
rotate the mirror vertically and horizontally so it directs the light beam to
the insulator.
You can perform this inside method during daylight hours if you
close doors and pull drapes enough to subdue unwanted light to a tolerable
level. If shadows are not crisp on ordinary paper, it helps to use "onion
skin" typewriter copy paper. A good spot flashlight with reasonably fresh
batteries also helps!
You can naturally reverse the first-described method -- placing the insulator
and light on the inside of the house window, and going outside to trace the
profile. If you can't get the inside light back at least 20' from the insulator,
you can lengthen the light path with a mirror as shown in Figure 2.
Now, hopefully, you will want us to be able to make an accurate drawing of
your insulator, so if it has a crown detail or other hidden exterior features
which do not show in the shadow tracing, make a separate sketch which will
indicate these.
Now measure and record the following dimensions:
A. Overall height of the insulator
B. Overall outside diameter at base of the
outer skirt
C. Centerline diameter of any interior petticoat(s)
D. Amount
petticoat extends below the skirt, or amount it is recessed above the skirt rim
E. Height of the slot between outer skirt and petticoat(s)
F. Height of the
"collar" where the threads start
G. Height of the pin hole top
H.
Approximate diameter of pin hole and type of "threads"
Make all the vertical measurements from the very bottom surface of the
insulator, whether that be the outer skirt or an interior petticoat. It's handy
to cut a narrow cardboard strip and measure its penetration up into the pin hole
and various recesses.
THE INSULATOR WITH AN IRON TUTU!!
At the Central Regional Show last spring in Omaha, Nebraska, Paul Ickes
presented me with the insulator pictured on the following page. It is a pinkish
straw Dominion 42 (CD 154) and is wearing a skirt! And of corrugated iron, yet! It is loose fitting and can be moved
around at will, but will not come off.
"Paul", I said, "tell me about this one". Basically, he pleaded ignorance, though he offered a few possible
reasons, none of which he could prove! But he did say it had been found in
Canada, and of course, with DOMINION 42 embossed right on it, there was no
argument there.
Some weeks later, I wrote to Oscar Chaput (Ontario, Canada),
hoping he could provide an answer. That was a good decision! Please read his
answer following:
|
Dear Marilyn,
Good to hear from you! I am familiar with the skirted Dominion
42. I have seen several of them during the last couple of years, and they have
all come from Western Canada, specifically the Rockies. According to several
people I have talked to, they are used to protect the insulator from falling
rocks in the mountainous areas of the country.
|
The rest of the letter pertained to other things, so I will not include it. I
tell you what, though: Oscar, and so many others like him in places other than
the U.S.A., have been a real help in providing information that we would not
have had otherwise.
I just want to put in a plug for our fellow collectors in
other countries, who have been so much help in filling in the missing pieces to
the puzzles we sometimes have when trying to put our insulator stories together.
And now I show you the pictures. Each is taken from a different angle. This
certainly would add interest to any display of Canadian insulators. Hmmmmmmm!
Gives me an idea!
| 
)
)
)